Creating a layered design in an application is a fundamental element of modern software architecture. The goal is to promote the Separation of Concerns (SoC) design principle. Separation of Concerns The ideas behind SoC date back to Dijkstra's 1974 paper "On the role of scientific thought" . In computer science, separation of concerns (sometimes abbreviated as SoC) is a design principle for separating a computer program into distinct sections. Each section addresses a separate concern, a set of information that affects the code of a computer program. A concern can be as general as "the details of the hardware for an application", or as specific as "the name of which class to instantiate". A program that embodies SoC well is called a modular program. Modularity, and hence separation of concerns, is achieved by encapsulating information inside a section of code that has a well-defined interface. - Wikipedia SoC is a broad design principal th...
A common way to secure a public WebAPI is through API Keys. An API Key is a unique code assigned to a user (or process) that allows them to access the API by sending the API Key in an HTTP header. The API Key header is often named something like X-API-KEY, but you can name the header anything you want.
There are numerous ways to implement API Keys. We'll go through one example in ASP.NET that uses a custom ActionFilter class to secure individual controllers and actions. We'll also examine a custom Middleware class that can be used to secure an entire API web application. There are benefits to both strategies. Securing the API at the controller or action level offers more flexibility, but requires more development overhead and the increased possibility of security holes. Securing an entire API via middleware is easier and less likely to have security holes, but you must offer the users another method to request an API Key. We'll focus primarily on the ActionFilter implementation here.
For simplicity, this example will use an in-memory DbContext to temporarily store the generated API Keys. We'll create a public/insecure controller where a user can request an API Key, and a separate controller that is secured using API Keys.
Let's look at what an API Key class might look like, this is what we'll store in our data repository:
/// <summary>
/// Simple API Key class
/// </summary>
public class APIKey
{
	[Key]
	[DatabaseGenerated(DatabaseGeneratedOption.Identity)]
	public int Id { get; set; }

	/// <summary>
	/// Encrypted API Key
	/// </summary>
	public string Key { get; set; } = string.Empty;

	/// <summary>
	/// DateTime in UTC the API Key was created
	/// </summary>
	public DateTime CreatedDateTime { get; set; }

	/// <summary>
	/// DateTime in UTC the API Key will expire
	/// </summary>
	public DateTime ExpiresDateTime { get; set; }

	/// <summary>
	/// UserId the API Key is associated with
	/// </summary>
	public int AssignedToUserId { get; set; }
}
This is a simple example; we store an ID, the key's value, a creation timestamp, an expiration timestamp, and the user this API Key is assigned to. You can store additional data as needed.
Let's look at the controller that allows a user to request a new key:
/// <summary>
/// This controller is not protected by an API Key because it is used to request an API Key
/// </summary>
[ApiController]
[Route("[controller]")]
public class RequestAPIKeyController : Controller
{
	private readonly APIKeysDB _apiKeysDB;

	public RequestAPIKeyController(APIKeysDB apiKeysDB)
	{
		_apiKeysDB = apiKeysDB;
	}

	[HttpGet]
	public async Task<string> Get()
	{
		// the API Key should be unique... we'll just use a GUID
		var apiKey = Guid.NewGuid().ToString();

		var newAPIKey = new APIKey()
		{
			Key = apiKey,
			CreatedDateTime = DateTime.UtcNow,
			ExpiresDateTime = DateTime.UtcNow.AddDays(90)

			// to request an APIKey, the user should already be authenticated (via Identity, OAuth2.0, etc)
			// In a real world application, use the Authorization infrastructure to lookup a User Id and assign it here
			// TODO: AssignedUserId = IHttpContextAccessor.HttpContext.User.Identity.Name;
		};

		_apiKeysDB.Add(newAPIKey);
		await _apiKeysDB.SaveChangesAsync();

		return apiKey;
	}
}
NOTE: To keep this example simple, we are not implementing any authentication in this application. Most real-world applications would have some sort of authentication on the RequestAPIKeyController and we would look up the user id and save that data with the new API Key. Additionally, a real world application would probably not be interacting directly with a database from inside the controller, there should be layers of abstraction to reduce coupling.
At this point, we have a way to assign an API Key to a user. Let's look at securing a controller and/or controller action. We'll do that through a custom ActionFilter class. We'll encapsulate the API Key validation logic in a static class so that we can re-use the same code in the ActionFilter and the Middleware classes. Here is the static class that will determine the status of the API Key:
/// <summary>
/// This class exposes methods to calculate the API Key's status
/// </summary>
public static class APIKeyChecker
{
	/// <summary>
	/// List of possible statuses for an API Key
	/// </summary>
	public enum APIKeyStatus
	{
		Invalid = 0,
		Expired = 1,
		Valid = 2
	}

	/// <summary>
	/// Check the API Key
	/// </summary>
	/// <param name="apiKey">value of the API Key to test</param>
	/// <param name="apiKeysDB">APIKeysDB DbContext used to check the API Key</param>
	/// <returns>Status of the API Key</returns>
	public static APIKeyStatus CheckAPIKeyStatus(string? apiKey, APIKeysDB? apiKeysDB)
	{
		var apiKeyStatus = APIKeyStatus.Invalid;

		if (apiKeysDB != null && !string.IsNullOrEmpty(apiKey))
		{
			// search the DB for a matching API Key
			// NOTE: if the application uses Authentication (Identity, OAuth2.0, etc), filter on the user id also
			var matchingApiKey = apiKeysDB.APIKeys.FirstOrDefault(f => f.Key == apiKey);

			// Found a matching key
			if (matchingApiKey != null)
			{
				// make sure the key is not expired
				if (matchingApiKey.ExpiresDateTime < DateTime.UtcNow)
				{
					// If API Key is expired, we will notify the user
					apiKeyStatus = APIKeyStatus.Expired;
				}
				else
				{
					// API Key is valid
					apiKeyStatus = APIKeyStatus.Valid;
				}
			}
		}

		return apiKeyStatus;
	}
}
Let's look at the ActionFilter that will handle the request and check the API Key:
/// <summary>
/// This class is an ActionFilter that inspects the HTTP Request for an API Key. If a valid API Key is not found, it returns a 401.
/// NOTE: for larger applications, caching should be implemented to improve performance.
/// </summary>
public class APIKeyFilter : ActionFilterAttribute
{
	public override async Task OnActionExecutionAsync(ActionExecutingContext context, ActionExecutionDelegate next)
	{
		// assume the API Key is invalid
		var apiKeyStatus = APIKeyChecker.APIKeyStatus.Invalid;

		// make sure there is an X-API-KEY header
		if (context.HttpContext.Request.Headers.ContainsKey("X-API-KEY"))
		{
			// use the global ServiceCollection to get the DBContext that this method needs
			var apiKeysDB = context.HttpContext.RequestServices.GetService(typeof(APIKeysDB)) as APIKeysDB;

			// grap the X-API-KEY value from the header. We've already confirmed that it exists.
			var apiKey = context.HttpContext.Request.Headers["X-API-KEY"];

			// determine the API Key status
			apiKeyStatus = APIKeyChecker.CheckAPIKeyStatus(apiKey, apiKeysDB);
		}

		// if the API Key is invalid, return a 401 with an "Unauthorized" message
		if (apiKeyStatus == APIKeyChecker.APIKeyStatus.Invalid)
		{
			context.HttpContext.Response.StatusCode = (int)HttpStatusCode.Unauthorized;
			context.HttpContext.Response.ContentType = "text/plain";
			await context.HttpContext.Response.WriteAsync("Unauthorized");

			return;
		}
		// if the API Key is expired, return a 401 with an "API Key Expired" message
		else if (apiKeyStatus == APIKeyChecker.APIKeyStatus.Expired)
		{
			context.HttpContext.Response.StatusCode = (int)HttpStatusCode.Unauthorized;
			context.HttpContext.Response.ContentType = "text/plain";
			await context.HttpContext.Response.WriteAsync("API Key Expired");

			return;
		}

		// continue processing the request
		await next();
	}
}
The code above will take the incoming Action request, look for an X-API-KEY value in the HTTP headers, then confirm that the API Key is valid. If the API Key is missing or invalid, the ActionFilter will return a 401 code to the browser.
To secure a controller or action, we simply add the APIKeyFilter attribute. Here is an example of securing an entire controller, but the attribute can be placed on a specific action as well.
/// <summary>
/// Controller to view Gagdets, all actions in the controller are protected by an API Key
/// </summary>
[ApiController]
[Route("[controller]")]
[APIKeyFilter]
public class GadgetController : ControllerBase
{
	private readonly ILogger<GadgetController> _logger;

	public GadgetController(ILogger<GadgetController> logger)
	{
		_logger = logger;
	}

	[HttpGet]
	public IEnumerable<Gadget> Get()
	{
		return new List<Gadget>(){new Gadget()
			{
				Id = 1,
				GadgetType = "Type A",
				UsageInstructions = "Use Gadget A to assemble Widgets."
			},
			new Gadget()
			{
				Id = 2,
				GadgetType = "Type B",
				UsageInstructions = "Use Gadget B to test Widgets."
			},
			new Gadget()
			{
				Id = 3,
				GadgetType = "Type C",
				UsageInstructions = "Use Gadget C to use Widgets."
			}
		};
	}
}
There is one step left to make testing this code easier, and that is the configure Swashbuckle to allow us to input the API Key. We can do that by configuring the security definitions and requirements as below. This code would be in the Program.cs or Startup.cs of your web application.
builder.Services.AddSwaggerGen(c => {
    c.SwaggerDoc("v1", new OpenApiInfo { Title = "API Keys", Version = "v1" });
    c.AddSecurityDefinition("X-API-KEY", new OpenApiSecurityScheme
    {
        Description = "X-API-KEY must appear in header",
        Type = SecuritySchemeType.ApiKey,
        Name = "X-API-KEY",
        In = ParameterLocation.Header,
        Scheme = "ApiKeyScheme"
    });

    c.AddSecurityRequirement(new OpenApiSecurityRequirement
    {
        {
            new OpenApiSecurityScheme()
            {
                Reference = new OpenApiReference
                {
                    Type = ReferenceType.SecurityScheme,
                    Id = "X-API-KEY"
                },
                In = ParameterLocation.Header
            },
            new List<string>()
        }
    });
});
When we run the application and test it using SwaggerUI, first we request the API Key:
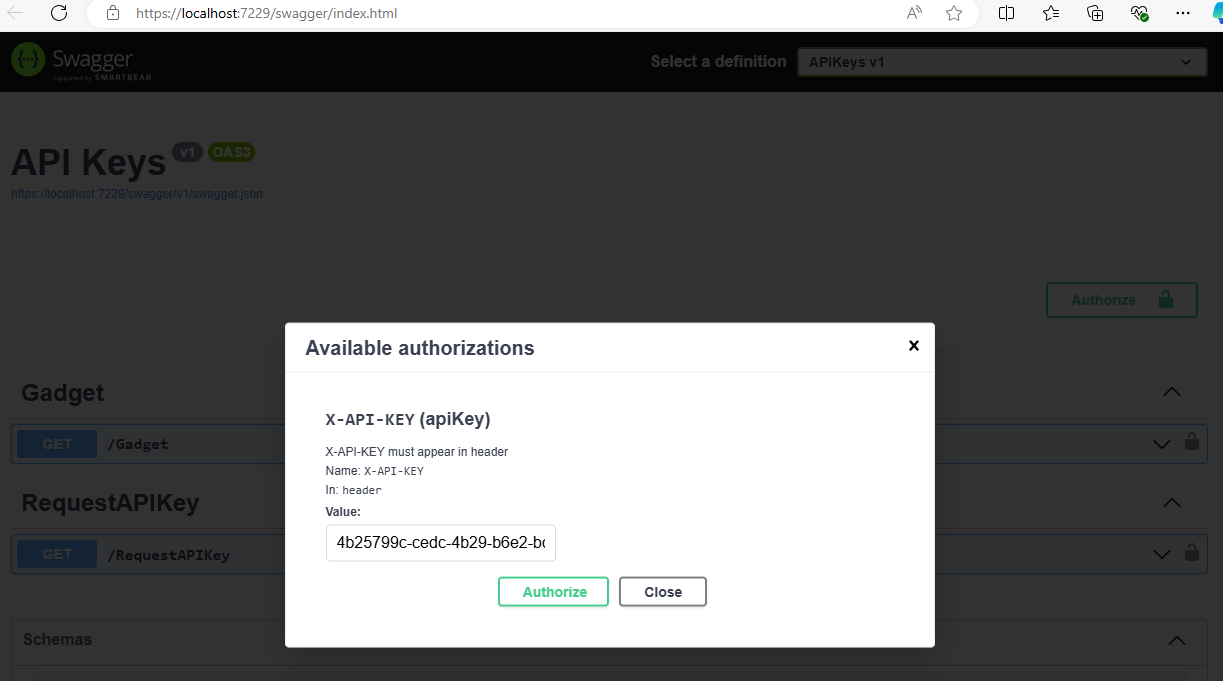
Enter the API Key using the SwaggerUI Authorize screen:
When calling a secured action, you can see that the API Key is passed as the X-API-KEY header:
If we want to secure the entire application with API Keys, we can do that using a Middleware class that is almost identical to the APIKeyFilter action filter class. Here is an example Middleware class:
/// <summary>
/// This class is Middleware that inspects the HTTP Request for an API Key. If a valid API Key is not found, it returns a 401.
/// NOTE: for larger applications, caching should be implemented to improve performance.
/// </summary>
public class APIKeyMiddleware
{
	private readonly RequestDelegate _requestDelegate;

	public APIKeyMiddleware(RequestDelegate requestDelegate)
	{
		_requestDelegate = requestDelegate;
	}

	public async Task InvokeAsync(HttpContext httpContext)
	{
		// assume the API Key is invalid
		var apiKeyStatus = APIKeyChecker.APIKeyStatus.Invalid;

		// make sure there is an X-API-KEY header
		if (httpContext.Request.Headers.ContainsKey("X-API-KEY"))
		{
			// use the global ServiceCollection to get the DBContext that this method needs
			var apiKeysDB = httpContext.RequestServices.GetService(typeof(APIKeysDB)) as APIKeysDB;

			// grap the X-API-KEY value from the header. We've already confirmed that it exists.
			var apiKey = httpContext.Request.Headers["X-API-KEY"];

			// determine the API Key status
			apiKeyStatus = APIKeyChecker.CheckAPIKeyStatus(apiKey, apiKeysDB);
		}

		// if the API Key is invalid, return a 401 with an "Unauthorized" message
		if (apiKeyStatus == APIKeyChecker.APIKeyStatus.Invalid)
		{
			httpContext.Response.StatusCode = (int)HttpStatusCode.Unauthorized;
			httpContext.Response.ContentType = "text/plain";
			await httpContext.Response.WriteAsync("Unauthorized");
			return;
		}
		// if the API Key is expired, return a 401 with an "API Key Expired" message
		else if (apiKeyStatus == APIKeyChecker.APIKeyStatus.Expired)
		{
			httpContext.Response.StatusCode = (int)HttpStatusCode.Unauthorized;
			httpContext.Response.ContentType = "text/plain";
			await httpContext.Response.WriteAsync("API Key Expired");
			return;
		}

		// continue processing the request
		await _requestDelegate(httpContext);
	}
}
To hook up the Middleware to check API Keys for every call to our application, we can configure the Middleware with the following line:
app.UseMiddleware<APIKeyMiddleware>();
Overall, this is a fairly easy way to secure an API. In real world applications there would be numerous try/catch blocks and additional logging. There is a lot of room for enhancements to the functionality of this code. Adding API Usage statistics (key usage count, key usage count in the last hour, last access timestamp, caller's ip addresses, etc) can be used to prevent the abuse of API Keys. In a real world scenario, we'd need to implement a feature to prune dead/abandoned API Keys from the data repository. We'd also optimize the ActionFilter and/or Middleware to optimize calls to the data repository. The assignment of an API key may require some level of administrative approval, so a real world application may need adminstrative UIs to approve the issuance of API Keys. All of those features build on top of the general principals demonstrated here.
This example was created using Visual Studio 2022 running an ASP.NET Core Web API project using .NET 8.